Showing posts with label fibre art. Show all posts

Saturday, April 5, 2014

world of threads - time to get the thread out

The call for submissions is open for the World of Threads festival. It's a world class, juried exhibition that's open to applicants from all countries, and to a wide variety of needlework. I've participated in a couple of the past festivals, but as part of a group show. This year, I'm planning on entering pieces into the juried show. Are you up for the challenge? If so, click on the link and wander about. The site has fabulous photos of previous years work! Yes, some of it is huge, but there's room for all sizes! Mine certainly won't be that large. The deadline for submission is April 22nd. http://www.worldofthreadsfestival.com/submissions.html
Exerpt from the WOT blog: "The festival is an international showcase of contemporary fibre art. We are a not-for-profit initiative with charitable status. We exhibit innovative fibre based art from around the world and highlight the strength of our local talent. The Festival is run by dedicated volunteers Dawne Rudman (Chair & Festival Curator) and Gareth Bate (Festival Curator). Exhibitions are carefully planned by various curators. Beginning in 1994 as a single Oakville exhibition, the festival continues to grow in size and ambition. The exhibitions feature work submitted by hundreds of artists from around the world. For the 2012 festival we expanded into Toronto. We will continue to be based in Oakville, Ontario. The town of Oakville, Ontario, Canada is located on Lake Ontario 45 minutes west of Toronto and is part of the Greater Toronto Area. . Oakville has a vibrant cultural scene for which the World of Threads Festival is a prominent player. Toronto is the largest city in Canada and has a large and important art world. The festival draws visitors from across the region and internationally." See you there!

Thursday, February 20, 2014

what if i experiment with hand stitch?

What if I'm just cruising along on a friend's blog and find a new book to purchase from Amazon? What if it's called Stitch and Structure, Design and Technique in two-and three-dimensional textiles, by Jean Draper? What if I actually skim the book cover-to-cover and stop on a section that talks about using hand stitch on water-soluble stabilizer (WS)? What if I had never thought of this? What if I find it very exciting? What if I made two small experimental pieces, over two days, and then decided that I needed to stop for a while, because my hand was hurting. What if I'll get back to it later?
What if I sandwiched thread waste and used teabags between the WS and then stitched with a running stitch? What if I knotted the thread intersections? What if I sandwiched strips of felted, thrift store wool between WS and then stitched with running and cretan stitches? What if I say there's an awful lot more to explore in this book? What if I say that I've actually finished my February bead journal, but am having trouble photographing it? What if I say that I'll return in the next couple of days>

Sunday, December 11, 2011

worms fini!

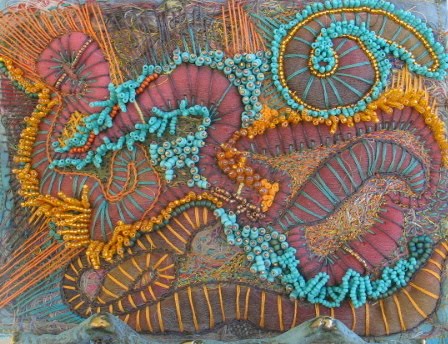
Never give up!!! See what happened when I was challenged to add beads to a sample I made in a Penny Berens class. After seeing my Bead Journal pieces, Penny tempted me to add some beads, so add them I did!!! What do you think?

Look here if you want to see where I started. Do you think I became a little obsessed?

The edges aren't finished yet. I'm not sure what I'm going to do with it, but the size is just about right for a book cover. Or, perhaps the focal in a larger piece.....only time will tell.......Any other ideas?

Presenting the finished worms!


Detail shots....The spiral looked out of place after I finished backstitching on the orange beads. I wasn't happy until I added a layer of turquoise fringe. Layer, layer, layer.....it doesn't matter if you're using paint, fabric or beads.....more layers = more depth!! Of course, it's hard to know when to stop, but I think I stopped just in time. LOL!


Techniques used:

Hand embroidery - french knots, straight stitch, back stitch, cross stitch and seed stitch

Bead embroidery - back stitch, stacked stitch, fringe and ruffle.

Monday, May 23, 2011

blue mood

A few shots of the piece that will be displayed in the Southampton Art School Gallery from now until September. It's a sample for the Introduction to Fibre Art class that Deb Milton and I will be co-teaching, July 30 to August 1st. This piece was trouble from the very beginning!! I had a vision and the muse insisted on making me sweat! I knew what I wanted to do, but couldn't seem to translate it into a finished piece. At the end, we came to terms, but it was almost scrapped and replaced. I'm glad that I perservered!!


Acrylic painted cotton and silk, heat distressed organza, machine wrapped braid edging, beads, hand embroidery, free motion machine embroidery, stitching over a gap with watersoluble stabilizer and just a touch of shading using Neocolour II Watersoluble crayons. Another example of my designing without a net! Everything was cut freehand............


Mainly machine stitching, with machine over hand seed stitches in the sky)


I do love the ruffly texture in these flowers. I'm glad that I had just the right colour of organza in my stash.


I call it "Blue Mood" for obvious reasons!! Do you think that it was worth all the angst?

Saturday, February 19, 2011

a rose is a rose is a rose


I'm involved in a "Receiver's Choice" block exchange with 9 members of my Sparkly Chickens Yahoo Group. At the end of 10 months, we will all have enough original blocks to make a very personal quilt. I chose a botanical theme in natures colours. This is my talented friend Candy's interpretation for the month of January. Raw edge machine applique with a lot of free motion stitching. Isn't it lovely? It arrived well before Valentine's Day, but I still think that it's something very special!! I love it!!!

Wednesday, January 26, 2011

shadowbox auction - textile museum of canada


Some of you might remember this post that shows the piece I donated to the Textile Museum of Canada's annual Shadowbox Auction. If you're interested in taking an on-line look at some of the other donated pieces, you can find them here . Just under the banner, you will see some links to the boxes. You can find me in the "Artists: A-G" section. I'm under the letter "D".

Friday, December 24, 2010

merry christmas to one and to all


I'm wishing you a happy, healthy and safe holiday season, full of friends, family and good times.

Sunday, December 5, 2010

rocks & mouse trails

Mouse Trails:

This is the piece I made for the President's challenge at my guild. The theme was "Small World". I scraped three or four colours of acrylic paint onto part of an old sheet, with an expired credit card. Then I stamped into it with more acrylic paint on the bottom of a large round tub. After it dried, I hand cut the little circles (ouch!), layered them like a quilt (it IS a quilting guild) and free motion quilted with my sewing machine. After that, I finished the edges by butting yarn up against the edge and zigzagging it in place. I laid out the circles and then stitched them together, first with a thread bridge (heavier stitching) and then by stitching the weblike strands. None of this was done with any type of stabilizer. I was stitching across the gap!!! You gotta love Bernina's!!! I was worried that it would be too flimsy and wouldn't hold together, but I'm pleased to report that it has.

How does this all relate to "Small World", you say? Well, it's all about how small the world has become with the internet, my communication with like minded artists all over the world, the inspiration I gain and the techniques that I learn. All for the cost of my high-speed internet. The sun shines on all of us and the open thread work represents the lines of communication. North, south, east and west......my mouse travels all over the world. The title of this piece is thanks to a suggestion from my friend Kaite in Australia.


Pinned on the corkboard, while I was contemplating adding more circles, and trying to figure out how the heck I was going to hang this!


Not a great photo, but this is what I eventually decided to do. I added a narrow sleeve on the back, used more of the yarn to make a length of machine wrapped braid and then hung it from one of the beaver sticks I picked up in Sault Ste Marie, last summer. I'll have you know that the bark was REALLY chewed off by a beaver! Right now the piece is hanging on a door, but I think that I'll eventually hang it from a hook on the ceiling.


I'm contemplating entering this in another show in the spring, so will need to take a better photo before then.

Rocks:

My friend Penny in Nova Scotia recently posted about some rocks and a nest. I thought that I would show you my version.


The nest is a bit of wet felting and I've been meaning to wrap some floss around the edges for years. Does anyone know how I coloured the rocks? A couple of you really might know (because you've either done it before or I talked/wrote about it in an earlier email), so please hold off on your answers until we get in a few guesses.

Yeah, I know that three would be more pleasing to the eye, but I only made two! LOL!

Happy guessing!

Sunday, June 6, 2010

April 2010 BJP AMD

April is all about blue. I love everything about it! The sky, the sea, eyes, jeans, indigo fabric, jazz and flowers. It was the colour that I was most often dressed in as a child (blue eyes, donchaknow?)and that I pulled out of the crayon box first. It still remains my favourite! Despite all of this, would you believe that I had a hard time working on this piece? Is it because I'm tiring of the series, or do I simply have the blues?

Like my earlier pieces, this one is based on an acrylic paint monoprint that I turned into a serendipity land & seascape. It was then hand and free motion machine embroidered. I peyote stitched the bezel and filled in the rest of my 6" square with a large variety of of beads, found objects and stitches. It was painful at times, but I'm more than satisfied with the results.

I particularly like the leaves and the beaded waves in the section shown below. The flat blue discs have been recycled from a thrift store necklace.


I was lucky enough to find a mismatched pair of dice in the infamous family button jar?


Wasn't it fortunate that I was able to find this rusty/squished beer bottle cap in just the right colour? Honest, I didn't rust it myself! The glass marble is also from the button jar, as are all of the BUTTONS! Imagine that!


My friend Deborah, kindly sacrificed forever polishing her silver spoon for this piece. I chose this one over Charles & Di. I wonder why? (BTW the thistle has absolutely no significance, it was just the right colour.) I also added my very first Russian Leaf (taught to me by Marilyn Parker at the Toronto Bead Society technique night). Perhaps that's why I've been blue. I've been wanting to make these for years but just couldn't get it! I tried and tried and tried again until I finally figured it out. Now, of course, I've forgotten how to do it, so the next one will be difficult as well. I found that I couldn't bead the leaf in front of the TV, because I kept forgetting which step I was on. I blame American Idol and Dancing With The Stars......Okay, so I'm a reality show junkie.....I admit it, but I am selective and I do have standards. LOL!


I rusted this brand new washer all by myself by soaking it in balsamic vinegar for a day and then exposing it to the elements for a couple of weeks. When I was happy with the colour, I coated it with a couple of coats of Krylon spray fixative in a matt finish. I don't know if the vinegar actually did anything, but I do like the results.


The reveal!!

Wednesday, May 26, 2010

To weave, or not to weave.....


My friend Kaite from Yarngarden is taking an on-line workshop from the extremely gifted Jude Hill. Kaite is already quite knowledgeable about weaving, basketmaking and all things fibre, but she thought that she might enjoy the additional exposure and the social aspect of this class. I was intrigued by the simple process, so decided to attempt it, with a few tips from Kaite. The following is my humble attempt at the raw edge weaving of some gifted decorator fabrics (two patterns & a sheer). Let me tell you, it didn't even put a small dent in the stash!!!! I rotary cut (roughly) and then wove the strips, stitched them by machine (apparently a no, no), then cut them in half and rewove them into a much smaller piece. After I finished, I threaded in some recycled sari yarn and added a few hand stitches for effect. I like it.....don't know what the heck I'll do with it....but it's actually quite addicting once you get going. I call the piece "Damn You Kaite", because it's not the project I was supposed to be working on last weekend. That one is still not finished!